Saturday, July 27, 2013

muslin time *sigh*


muslin time, originally uploaded by firesheep67.


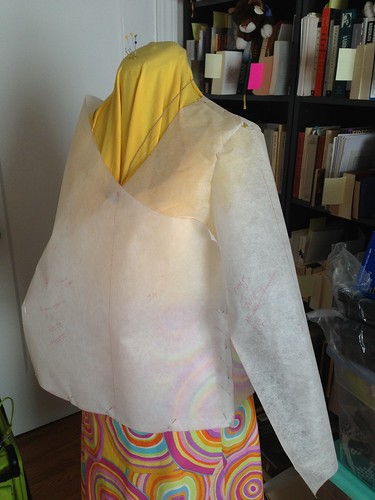
Thoughts while I worked on muslin #1:
1. The fabric is plasticky and see through - this is not a wearable muslin, why am I still reluctant to write on it?
2.  Must find better way of sewing knits. Tested straight stitch and pulled seams. They all popped. Switched to zig zag, but was too big, so could see "teeth" in the seams.
3. Stick to using the walking foot. Use the more narrow twin needle (must find the sizes). The wider twin needle created a huge tunnel between the stitches.
4. Neckline - while I did an impressive* job of stitching and easing, it was too tight for the design, so in the end, both fronts are pulling the side seams in. I examined a garment that is similar and the neckline is not a separate piece, it's just folded over and stitched down with presumably an elastic tape inside.

Muslin #2:
1. Will use a 1" seam on the neckline, folded over at 1/2" with elastic tape inside.
2. Front panel must be hemmed before sewing side seams.
3. Finish watching The Ultimate T-Shirt: Fitting & Construction on Craftsy and put the tips and tricks to use. Just watching how the knit fabric can be fed through the sewing machine with minimal use of pins has already helped enormously. Considering that the Ottobre pattern directions are minimalist, it's really good to bone up on how to construct a knit t-shirt. Even though this garment is a wrap front, 90% of the sewing tips and instructions still apply. I got my class on sale and it came with a pattern, Vogue 8793, which I have yet to take out of the envelope.
4. Will baste the side seams before final sewing. Very important when trying to get the wrap tight enough to cross over without gaping, but not so tight that it pulls the sides in.
5. I started cutting muslin #2 on Sunday, 7/28, but after I cut the back, I realized that I already didn't follow my own modified directions - that is, to include a 1" seam allowance on the neckline. Hope that there's enough fabric to cut a sleeve from the back. Also realized that my rotary cutting technique could use some improvement, so off to search for tips. Must also change the blade on the cutter. Don't know how long the blade has been on there, and technically haven't cut much with it, but think it might be a bit dull.
6. Before sewing, need to do another clean out of the sewing machine. While sewing muslin #1, the machine coughed up a greasy lint hairball which was subsequently sewn down into the sleeve seam. I have no idea where it came from, as I had recently cleaned (as far as I know) everything out. Very strange. Thank god the muslin wasn't anything I had hoped to wear. Will also see if I can clean the grease spot, for science. Just in case it happens when I'm sewing my good fabric.
7. Hemming of sleeves and bottom - not until side seams are sewn up. Follow the tips in the class re: pressing the hems while still flat.

Thoughts on muslins in general: apparently Kenneth King states that you should sew at least two muslins before proceding to cut the fashion fabric. Reluctantly, I concede that this makes perfect sense. If you want something truly wearable, you must put in the time and effort to do it right. Think about it - you pull a pattern from the envelope, and regardless of how close it may be to your measurements, more likely than not, it wasn't custom drafted for you. You'll need to make fitting alterations and perhaps even figure out how best to sew it - thus muslin #1. But, after figuring out what to keep and what to change, including order of construction, you should test the next round on muslin #2. You don't know what the outcome of the changes from muslin #1 are going to give you. Only after sewing a successful, i.e. potentially wearable muslin #2, can you proceed with confidence to the final garment. Thank god I really am a process sewer (knitter) or I would have already torn out every last strand of my short hair in frustration!

*I don't normally brag about my sewing...but considering I only watched the Ultimate T-Shirt video and had never sewn a neckline, and that this is my fifth garment (including muslins), the neckline looks awesome.

Friday, July 19, 2013

The siren of advertising calling across the years (Viking)


viking sewing machine ad 1956, originally uploaded by firesheep67.


I came across this ad online in the last year (and if you're the one who posted it, please let me know so I can give you credit!). Since it can be hard to read depending on your monitor and eyesight, I will take the liberty of retyping the ad before I comment...
Text from the ad:
Just sit, set and let VIKING sew!

NOW!

Viking

the world's most completely jam proof automatic sewing machines

Viking the world's most completely automatic sewing machine, is also the easiest to use! Made of fine Swedish Steel by the craftsmen of Sweden's celebrated Husqvarna, where superior engineering has been a tradition for over 250 years! VIKING is a real automatic!

Just sit, set and let VIKING sew with an ease you've never before known!

See it today!

Try it today!

VIKING automatic features you'll love...

  • exclusive JAM-PROOF HOOK makes it absolutely impossible for the thread to tangle or jam with or without fabric in the machine.
  • exclusive MAGI-STAC permits you to change stitches with a flick of the fingers without stopping the machine! 
  • exclusive SPEED REDUCER for s-l-o-w sewing when working on intricate patterns.

plus...20 more features never before offered in any one machine!

I LOVE a good ad! Even better I love to dissect the messages long after the target audience is no longer around. This ad is so good, that 57 years later, I still fall for it. Granted, I didn't see the ad until AFTER I found my Viking 21A, but boy, this ad makes me want to use my vintage machine more than any other I own. First off, according to the copy, my machine will sew by itself - no need for me to do anything other than watch it (like a TV?). One thing that still holds true to this day is the lure of the JAM-PROOF HOOK! That's actually what drove me into the arms of a vintage machine. I wasn't sewing on my Brother because of bobbin nesting. I spent more time angry and frustrated and troubleshooting rather than sewing. The JAM-PROOF HOOK promised salvation, and it has delivered, I'm happy to report :) The copy for the MAGI-STAC is hilarious. The "magi-stac" is now commonly referred to as a pattern cam, and I most certainly would not "change stitches with the flick of a finger" while the machine was going. (Mostly out of fear that I'll break an internal part that is NLA - no longer available.) The "exclusive SPEED REDUCER" is nice, but I rarely use it as I prefer to control sewing speed with the remarkably still responsive original controller. Note that "Swedish Steel" is capitalized...it's not just any steel. I'm not sure what the "20 more features" could be...hmmm...it's green (no - the Elna Grasshopper is green, and I suppose color is not considered a feature). Free-arm must be one...detachable sewing table...as for the rest? Being of Swedish descent and a huge Abba fan, Viking is my brand.

I will admit to cheating on my Viking 21A...with another Viking (a pair of them) - the Viking #1. Because of course, being #1 means it has to be even better than 21, right? ;)

Monday, July 15, 2013

Hemming and hawing


seam allowance year one, originally uploaded by firesheep67.

It's no secret that I'm slow. I've come to accept it (must be why I loved driving fast on the Autobahn). When it comes to sewing (and knitting, cross stitching, embroidery and crochet...) I am deliberate and fairly methodical. "Fairly" because in many other areas of life, developing a methodical approach has not come naturally. When I sew, I like to think of the act of sewing as an organic chemistry experiment. So, in that spirit, I am tackling the hem on my wrap skirt.

Update on the skirt: I "finished" it - that is, everything is sewn together and there is the beginning of a hem. I even wore it to last night's Seam Allowance meeting. Yet, the waistband ties need a touch of resewing to neaten up the seam on the edge and the hem is not yet done. I think I will add a hook and bar closure to secure the waist, as the ties can worm themselves undone. I had to admit that the piece I wanted to be the back (that is, the original front), insisted on being the front, so I am wrapping the skirt to the back and tying it almost in the middle on the front. To really turn the skirt around, the waistband pieces for the ties would need to be lengthened before cutting so you can tie on the side. I folded under the hem and pressed at 1/4" with the Dritz Ezy Hem. It took a while to neatly and evenly press the hem (30 minutes?). I was aiming for the 1/8" edge stitching recommended by Doris Anderson in Lesson 7 of "Simplified Systems of Sewing." I stitched the hem at 1/8", but was working with the 1/4", which I will trim down before the final hemming.

Which leads me to...the final hem. I actually like the current length, but originally had intended on a hem of 1.5 inches or so. Also, the current hem provides no heft, but I think if I want to leave it at this length, a woven ribbon or hem tape secured by hand stitching over the raw edge could help with that. So, I am now researching hemming techniques.

Thanks Beadknit for the photo!

Sunday, July 7, 2013

Tracing and cutting (avoiding the waist on my wrap skirt)

I can't resist the promise of Ottobre magazine. I have all but three (?) issues and am convinced that the garments are flattering and must be easy to sew. So I started tracing the wrap blouse from the Fall 2008 magazine, model #17, at yesterday's Seam Allowance studio time. I finished the tracing today and started cutting the fabric for a muslin. I've had the fabric for about five years, purchased from FabricMart for practically nothing. Well, this was before I started carefully bagging each piece of fabric and this one has tiny marks that look like ink spots. Fortunately, the yardage is sufficient and I can simply cut around the spots.
 
This is the fabric in question...it's quite slippery and when cut, sheds tiny fibers everywhere. I figure if I can sew a muslin from this, then the final garment will be a breeze.